Pals Blog Hop- Case the Catalogue

Welcome to the Stampin’ Pretty Pals’ Blog Hop! 

This month, the theme is CASE the Catalogue. We really hope that you will be inspired by all the amazing creations the Pals are sharing with you! Then, you will find the lineup at the end of my post to help you “hop” along from Pal to Pal.

CASE- Copy And Share Everything
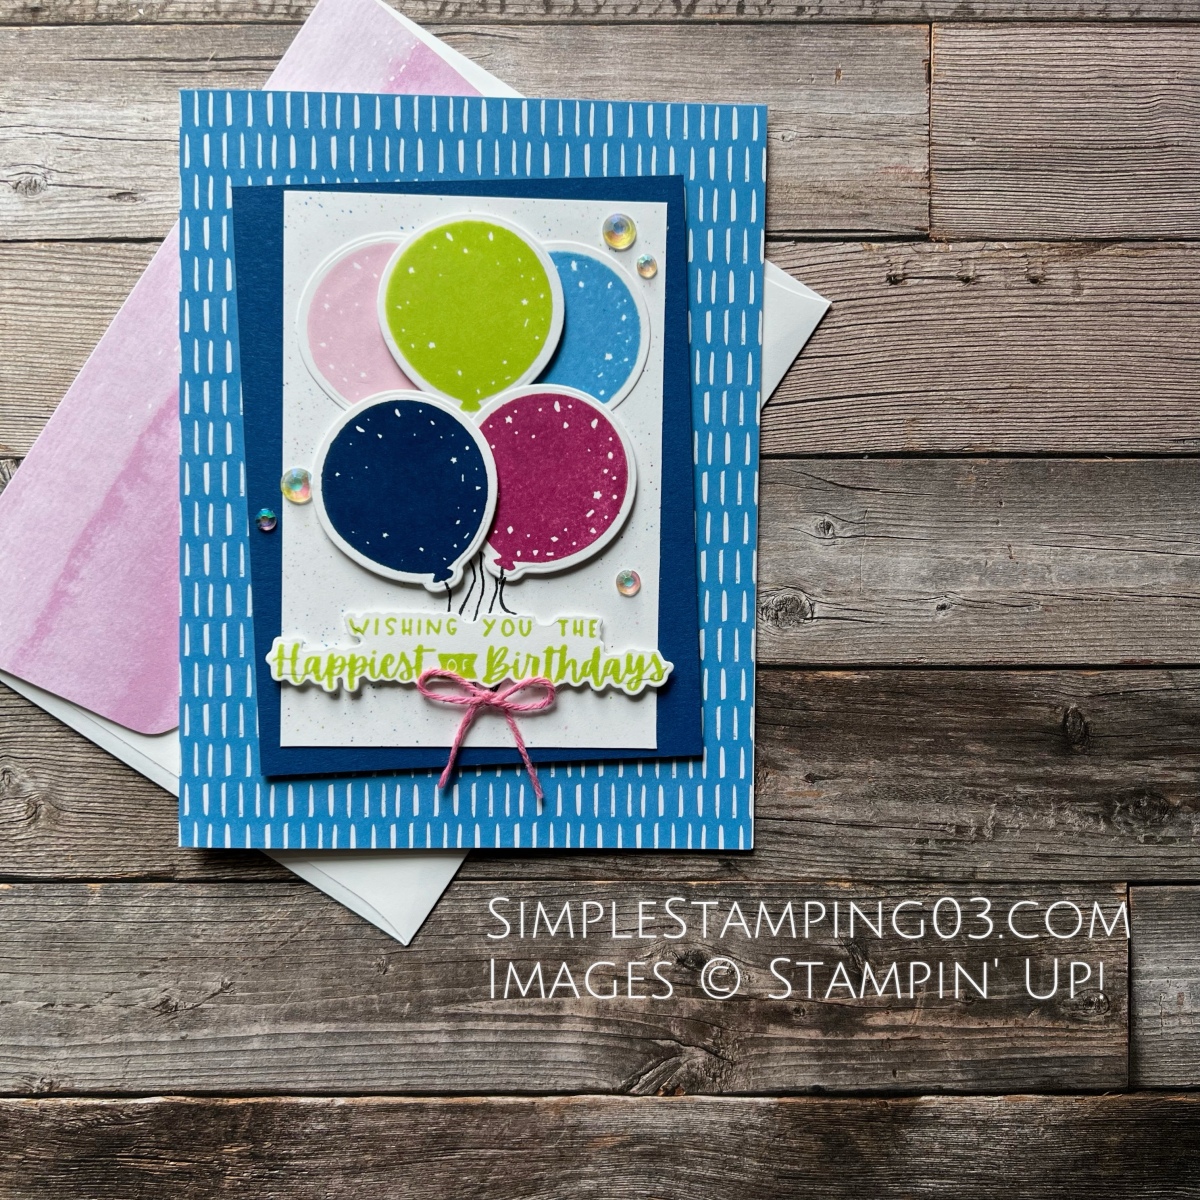
I am so happy to be able to Hop along with the Pals this month!! Sorry for my absence but hockey has taken over my life the last few months…. I consider myself a professional “CASE”er. So, CASEing the catalogue was a Hop I did not want to miss! I found my inspiration on page 18 of the 2023-2024 Annual Catalogue. I wanted to mix it up by using brighter colours (Azure Afternoon, Berry Burst, Blueberry Bushel, Bubble Bath & Parakeet Party).

Step by Step Tutorial 

– Begin with a 5 ½ x 8 ½ card base of Basic White thick cardstock; scored at the 4 ¼ using a Paper Trimmer

– Use the Paper Trimmer to cut
Brights 6×6 DSP (Azure Afternoon to 4 ¼ x 5 ½  
Blueberry Bushel cardstock to 3 ¼ x 4 ¼
Basic White cardstock to 2 ¾ x 4

– On a scrap piece of Basic White cardstock, stamp the balloon image from the Beautiful Balloon stamp set using Azure Afternoon, Berry Burst, Blueberry Bushel, Bubble Bath & Parakeet Party inks.
– On a scrap piece of Basic White cardstock, stamp the sentiment from the Charming Sentiments stamp set using Parakeet Party ink.

– Run the stamped balloons through a Stampin’ Cut & Emboss Machine using the Beautiful Balloon dies.
– Run the stamped sentiment through a Stampin’ Cut & Emboss Machine using the Sentiment Silhouette dies.

– Adhere the Azure Afternoon DSP to the card base using Tombow liquid glue.

– On the 2 ¾ x 4 piece of Basic white cardstock, use Stampin’ Write markers to “flick” the ink on using Azure Afternoon, Berry Burst, Blueberry Bushel, Bubble Bath & Parakeet Party; then adhere to the Blueberry Bushel cardstock. Adhere the layered cardstock to the card base using dimensionals.

– Glue the die cut balloons using Tombow glue & dimensionals. I hand drew the balloon strings using a black Stampin’ Write marker.

– Adhere the sentiment using dimensionals.

– Cut a piece of white Bakers Twine (Essentials Pack) & colour with the dark Bubble Bath Stampin’ Blends. Tie into a bow & adhere with a mini glue dot.

– For the bling, I used several Iridescent Rhinestones Basic Jewels

– To dress up the envelope, glue Bright & Beautiful DSP to the flap of the envelope then fussy cut it.

More inspiration awaits, so use the lineup below to visit the rest of the Design Team. The Pals are very excited to show you what they’ve created! Then, please mark your calendars for our next blog hop next month (always the second Wednesday each month), when our theme will be “Punch Your Art Out”.

Until then, have fun in your craft space.

Stampin’ Pretty Pals Blog Hop

  1. Mary Fish at Stampin’ Pretty
  2. Rae Burnet at Wild West Paper Arts
  3. Jackie Beers at Blue Line Stamping
  4. Melissa Seplowitz at The Stamping Ninja
  5. Beth McCullough at Stamping Mom
  6. Lori Webb at Clever Copies
  7. Peggy Noe at Pretty Paper Cards
  8. Mary Hanson at Up North Stampin’
  9. Stesha Bloodhart at Stampin’ Hoot!
  10. Su Mohr at Aromas And Art
  11. Jill Loveland at Simple Stamping ←You are here
  12. Debbie Mageed at Secrets to Stamping
  13. Tricia Chuba at ButterDish Designs
  14. Deb Walker at Deb Stamps Life
  15. Windy Ellard at Windy’s Wonderful Creations
  16. Sue Jackson at Just Peachy Stamping

Pals Blog Hop- Flowers In The Garden

Welcome to the Stampin’ Pretty Pals’ Blog Hop!

This month, the theme is Flowers in the Garden. We hope you are inspired by all the wonderful creations the Pals share with you! As you hop from blog to blog, we love reading your comments. Then, you will find the lineup at the end of my post to help you “hop” along from Pal to Pal.

Ok, I am not going to lie. It was REALLY REALLY REALLY hard to pick which flower set I was going to use. Poppies, sunflowers, tulips, daffodils, etc. Tulips are starting to pop here in the Pacific Northwest. La Conner, WA has a gorgeous tulip area that I try to visit each year. I finally settled down on the wildflowers from the Greatest Journey stamp set. It reminds me of the flowers I see when hiking in the summer here in the PNW. And, I was able to use yellow. Always pick yellow 🙂 This stamp set is on the retiring list which makes me sad. It is such a versatile stamp set. The sentiments are fresh & lovely.

Step by Step Tutorial 

– Begin with a Tea Boutique card base (Orchid Oasis) ** currently on sale for 60% off***

– Use the Paper Trimmer to cut
Basic White to 2 ⅝ x 3 ⅞
Brights 6×6 DSP (Daffodil Delight) to 1 ¾ x 5 ½

– Run a sheet of Parakeet Party (2022-2024 In-Colour Glimmer Paper) through a Stampin’ Cut & Emboss Machine using the Scalloped Contours dies.

– On a scrap piece of Basic White cardstock, stamp the wildflower image from the Greatest Journey stamp set using black Memento ink.

– Colour the wildflowers using Stampin’ Blends.
Light & dark Daffodil Delight
Light & dark Mossy Meadow
Light & dark Polished Pink
Light & dark Granny Apple Green
Light & dark Orchid Oasis
Light & dark Soft Succulent

– Run the coloured wildflowers through a Stampin’ Cut & Emboss Machine using the coordinating Greatest Journey dies.

– Adhere the Brights Daffodil Delight strip to the Tea Boutique card base using Tombow liquid glue.

– On the Tea Boutique card front, stamp the sentiment with Versamark ink (sentiment from Framed Florets stamp set). Cover with black Basics Embossing Powder then set with a Heat Tool.

– Adhere the scalloped die cut glimmer paper to the Whisper White layer using Tombow liquid glue. Then adhere to the card base using dimensionals.

– Adhere the die cut wildflowers to the scalloped die cut glimmer paper using dimensionals.

– Add a few Brushed Brass Butterflies & dream of warmer days ahead while finding the perfect place for them.

– To dress up the envelope, I glued Brights (Daffodil Delight) DSP to the flap of the envelope then fussy cut it.

This is the photo that inspired my card; Mt Rainier in Washington state

More inspiration awaits, so use the lineup below to visit the rest of the Design Team. The Pals are very excited to show you what they’ve created! Then, please mark your calendars for our next blog hop on May 10th, when our theme will be a Tic Tac Toe challenge, where our Design Team will create projects, using elements/supplies that are three in a row, column, or diagonal from the tic tac toe board.

Until then, have fun in your craft space.

Stampin’ Pretty Pals Blog Hop

  1. Mary Fish at Stampin’ Pretty
  2. Debbie Mageed at Secrets to Stamping
  3. Peggy Noe at Pretty Paper Cards
  4. Tricia Chuba at ButterDish Designs
  5. Jill Loveland at Simple Stamping ←You are here
  6. Melissa Seplowitz at The Stamping Ninja
  7. Stesha Bloodhart at Stampin’ Hoot!
  8. Windy Ellard at Windy’s Wonderful Creations
  9. Ann Murray at Murray Stamps Ink
  10. Sue Jackson at Just Peachy Stamping
  11. Su Mohr at Aromas And Art
  12. Rosanne Mulhern at Heartfelt Stamping
  13. Mary Hanson at Up North Stampin’
  14. Deb Walker at Deb Stamps Life
  15. Lisa Ann Bernard at Queen B Creations
  16. Beth McCullough at Stamping Mom
  17. Lori Webb at Clever Copies
  18. Rae Harper Burnet at Wild West Paper Arts

Our tulip fields in La Conner, WA

Pals Blog Hop- Party Time!

Welcome to the Stampin’ Pretty Pals’ Blog Hop!

This month, our blog hop theme is Party Time! We hope you will be inspired by all the beautiful creations the Pals made for you! As you hop from blog to blog, we would love for you to leave a comment. You will find the lineup at the end of my post to help you “hop” along from Pal to Pal.

I was recently inspired by my coworker & wanted to celebrate her & her hard work. On a clinic day, in our busy oncology clinic, 5 of the 6 nurses were out either on holiday or due to illness. The lone nurse had to run the clinic, manage the phone, pager, fax, emails, etc solo. She did an amazing job juggling it all & she did so with a smile on her face. I wanted to make a card to celebrate her. She loves food with faces & loves avocados. Naturally, the Taco Fiesta stamp set was the first stamp set that came to mind.

Step by Step Tutorial 

– Begin with a 5 ½ x 8 ½ card base of Parakeet Party cardstock; scored at the 4 ¼ using a Paper Trimmer

– Use the Paper Trimmer to cut
Basic White to 3 ⅞ x 5 ⅛
2022-2024 In Colour Glimmer Paper to 3 ¾ x 5
Basic Black to 2 x 3 ¾
Basic White to 1 ¾ x 3 ¾

– On a scrap piece of Basic White cardstock, stamp the avocado image from the Taco Fiesta stamp set using black Memento ink.

– On the 1 ¾ x 3 ¾ piece of Basic White strip, stamp the avocado image x2 & guacamole bowl from the Taco Fiesta stamp set using black Memento ink.

– Colour 3 avocados & the guac bowl using Stampin’ Blends.
Dark Crumb Cake for the thin skin layer of the avocado
Light & Dark Soft Suede for the avocado seed
Light & Dark Parakeet Party for the avocado & guac
Light Granny Apple Green for detail on the guac
Light & Dark Smoky Slate for the guac bowl

– Layer the stamped & coloured Basic White paper on top of the Basic Black paper using Tombow liquid glue. Then adhere to the Glimmer Paper using Stampin’ Seal. Trim up the edges as needed.

– Layer the Glimmer paper on top of the Basic White paper using Tombow liquid glue.

– Adhere the layered Glimmer paper to the card base using Dimensionals.

– Fussy cut the coloured avocado from the scrap piece of Basic White paper. Then, adhere using Dimensionals.

– On a scrap piece of Basic White cardstock, stamp the sentiment in black Memento ink. I masked off the words “it’s your birthday” before inking it up, then removed the mask before stamping.
* pro tip- use Masking Paper (155480) from the annual catalogue*

– Run the sentiment through a Stampin’ Cut & Emboss Machine using the Conversation Bubble dies.

– Run a scrap piece of Basic Black through a Stampin’ Cut & Emboss Machine using the Conversation Bubble dies.

– Stack the 2 bubble die cut outs & attach to the card front using Dimensionals. Make sure the Dimensionals on the back side touch both the black & white paper.

– The inside sentiment is from Waves of Inspiration stamp set.

– To dress up the envelope, I glued 2022-2024 In Colour DSP to the flap of the envelope then fussy cut it.

More inspiration awaits, so use the lineup below to visit the rest of the Design Team. The Pals are excited to show you what they’ve created! Then, please mark your calendars for our next blog hop on April 12th, when our theme will be Flowers in the Garden, showcasing cards/projects with flowers.

Until then, have fun in your craft space.

Stampin’ Pretty Pals Blog Hop

  1. Mary Fish at Stampin’ Pretty
  2. Jackie Beers at Blue Line Stamping
  3. Beth McCullough at Stamping Mom
  4. Debbie Mageed at Secrets to Stamping
  5. Lori Webb at Clever Copies
  6. Sue Jackson at Just Peachy Stamping
  7. Deb Walker at Deb Stamps Life
  8. Rosanne Mulhern at Heartfelt Stamping
  9. Stesha Bloodhart at Stampin’ Hoot!
  10. Windy Ellard at Windy’s Wonderful Creations
  11. Debbie Crowley at expressively deb…
  12. Lisa Ann Bernard at Queen B Creations
  13. Peggy Noe at Pretty Paper Cards
  14. Jill Loveland at Simple Stamping ←You are here
  15. Tricia Chuba at ButterDish Designs
  16. Su Mohr at Aromas And Art
  17. Melissa Seplowitz at The Stamping Ninja
  18. Rae Harper Burnet at Wild West Paper Arts

Pals Blog Hop- Celebrating Random Acts of Kindness

Welcome to the Stampin’ Pretty Pals’ Blog Hop!

This month, our blog hop team made projects to celebrate Random Acts of Kindness Week, which is February 14-20! We hope you will be inspired by all the beautiful creations the Pals made for you! As you hop from blog to blog, we would love for you to leave a comment. You will find the lineup at the end of my post to help you “hop” along from Pal to Pal.

So many think of February as a month of love & hearts for Valentines day. However, I am not much a fan for the holiday. When I read the theme of Random Acts of Kindness, I thought of those who help others. I see so much kindness & giving in our local community. I think those who constantly give should also be the recipient of a random act of kindness on occasion. That is what inspired my simple but elegant card.

Step by Step Tutorial 

– Begin with a 5 ½ x 8 ½ card base of thick Basic White cardstock; scored at the 4 ¼ using a Paper Trimmer

– Use the Paper Trimmer to cut
Distressed Gold DSP to 3 ¼ x 5 ½
Perfectly Penciled DSP to 4 x 5 ½

– Adhere the Perfectly Penciled DSP to the card base using adhesive of choice (I used Tombow liquid glue).

– Layer the Distressed Gold DSP on top of the Perfectly Penciled DSP using adhesive of choice (I used Tombow liquid glue).

– On a scrap piece of Basic White cardstock, stamp the bee image from the Queen Bee stamp set using black Memento ink (or black Staz-On ink).

– Run the stamped bee image through a Stampin’ Cut & Emboss Machine using the Queen Bee dies. Then, adhere to card base using dimensionals.

– On a scrap piece of Basic White cardstock, stamp the sentiment in black Memento ink. I used a sentiment from the Something Fancy stamp set.

– Run the sentiment through a Stampin’ Cut & Emboss Machine using the Beautiful Shapes dies. Then, adhere to card base using dimensionals.

– Run scrap vellum cardstock through a Stampin’ Cut & Emboss Machine using the Beautiful Shapes dies (x3). Then run them through the Stampin’ Cut & Emboss Machine using the Hive 3D EF (embossing folder).

– Adhere the 3 die cut/embossed vellum to the card front using Tombow liquid glue.

– Place Adhesive Sheet to scrap Basic Black cardstock. Then run through a Stampin’ Cut & Emboss Machine using the Queen Bee dies (x3). Peel off the back of the Adhesive Sheet & place on card front. Keep 3 of the punched out hexagons & adhere to the sentiment hexagon.

– Run a scrap piece of Distressed Gold DSP through a Stampin’ Cut & Emboss Machine using the tiny tiny heart from the Queen Bee dies. Adhere using glue of choice (I used Tombow liquid glue) to the body of the bee.

– To dress up the envelope, I glued Perfectly Penciled DSP to the flap of the envelope then fussy cut it.

More inspiration awaits, so use the lineup below to visit the rest of the Design Team. The Pals are excited to show you what they’ve created! Then, please mark your calendars for our next blog hop on March 8th, when our theme will be Party Time, showcasing cards/projects that celebrate our family & friends.

Until then, have fun in your craft space.

Stampin’ Pretty Pals Blog Hop

  1. Mary Fish at Stampin’ Pretty
  2. Beth McCullough at Stamping Mom
  3. Windy Ellard at Windy’s Wonderful Creations
  4. Tricia Chuba at ButterDish Designs
  5. Peggy Noe at Pretty Paper Cards
  6. Debbie Mageed at Secrets to Stamping
  7. Su Mohr at Aromas And Art
  8. Melissa Seplowitz at The Stamping Ninja
  9. Jackie Beers at Blue Line Stamping
  10. Lisa Ann Bernard at Queen B Creations
  11. Mary Hanson at Up North Stampin’
  12. Deb Walker at Deb Stamps Life
  13. Sue Jackson at Just Peachy Stamping
  14. Stesha Bloodhart at Stampin’ Hoot!
  15. Rae Harper Burnet at Wild West Paper Arts
  16. Karen Hallam at Karen’s Stamping Habit
  17. Rosanne Mulhern at Heartfelt Stamping
  18. Jill Loveland at Simple Stamping ←You are here
  19. Pamela Sadler at Stampin Pink Rose

Pals Blog Hop-Last Minute Gift/Card Ideas

Welcome to the Stampin’ Pretty Pals’ Blog Hop!

This month, the theme is Last Minute Gifts/Cards to inspire you with your holiday list. We really hope that you will be enjoy all the amazing creations the Pals are sharing with you! As you hop from blog to blog, we would love for you to leave a comment. You will find the lineup at the end of my post to help you “hop” along from Pal to Pal.

If you do not own the Mini Pocket Envelope dies (159167), put it on your wishlist! These dies are so simple to use & can be used for many occasions. One run through the Stampin’ Cut & Emboss machine it cuts & scores the template for you. Since gift cards & cash are on everyone’s list this year, the dies made it easy to make handmade holders.

Step by Step Tutorial

– Begin with a 5 ¼ x 4 ½ piece of DSP; I used Celebrate Everything DSP (retiring January 4th) & run it through a Stampin’ Cut & Emboss Machine using the Mini Pocket Envelope die

– Use a bone folder to burnish score/fold lines; then glue the 2 flaps using Tombow liquid glue.

– Use a scrap piece of Poppy Parade card stock & run it through a Stampin’ Cut & Emboss Machine using the Spruced Up Outlines dies .

– Use a scrap piece of 2022-2024 In Colour Glimmer Paper & run it through a Stampin’ Cut & Emboss Machine using the Spruced Up Outlines dies. I used the lighter part of the ombre towards the top of the ornament.

– Working from the backside using dimensionals, line up the ornament outline with the solid ornament. Once you have a good connection around the ornament, attach it to the Mini Pocket Envelope

– Stamp sentiment from Christmas to Remember on a scrap piece Basic White card stock using Night of Navy ink. Then, fussy cut & adhere to glimmer paper using Stampin’ Seal glue.

– For an extra bling, I used 3 Iridescent Rhinestone Basic Jewels

Below are a few other gift card holders I made using other dies from the Spruced Up Outline dies, Kindest Gnomes & Santa from the November Paper Pumpkin kit

More inspiration awaits, so use the lineup below to visit the rest of the Design Team. The Pals are excited to show you what they’ve created! Then, please mark your calendars for our next blog hop on January 11th when our theme will be Sale-A-Bration Time. The design team will showcase projects made from Sale-A-Bration items.

Until then, have fun in your craft space.

Stampin’ Pretty Pals Blog Hop

  1. Mary Fish at Stampin’ Pretty
  2. Windy Ellard at Windy’s Wonderful Creations
  3. Su Mohr at Aromas And Art
  4. Jackie Beers at Blue Line Stamping
  5. Sue Jackson at Just Peachy Stamping
  6. Peggy Noe at Pretty Paper Cards
  7. Jill Loveland at Simple Stamping ←You are here
  8. Tricia Chuba at ButterDish Designs
  9. Mary Hanson at Up North Stampin’
  10. Beth McCullough at Stamping Mom
  11. Deb Walker at Deb Stamps Life
  12. Debbie Mageed at Secrets to Stamping
  13. Debbie Crowley at expressively deb…
  14. Lori Webb at Clever Copies
  15. Lisa Ann Bernard at Queen B Creations
  16. Rae Harper Burnet at Wild West Paper Arts
  17. Melissa Seplowitz at The Stamping Ninja
  18. Stesha Bloodhart at Stampin’ Hoot!
  19. Karen Hallam at Karen’s Stamping Habit
  20. Pamela Sadler at Stampin Pink Rose