
Welcome to the Stampin’ Pretty Pals’ Blog Hop!
This month, the theme is All Creatures Great & Small. We really hope that you will be inspired by all the amazing creations the Pals are sharing with you! Then, you will find the lineup at the end of my post to help you “hop” along from Pal to Pal.

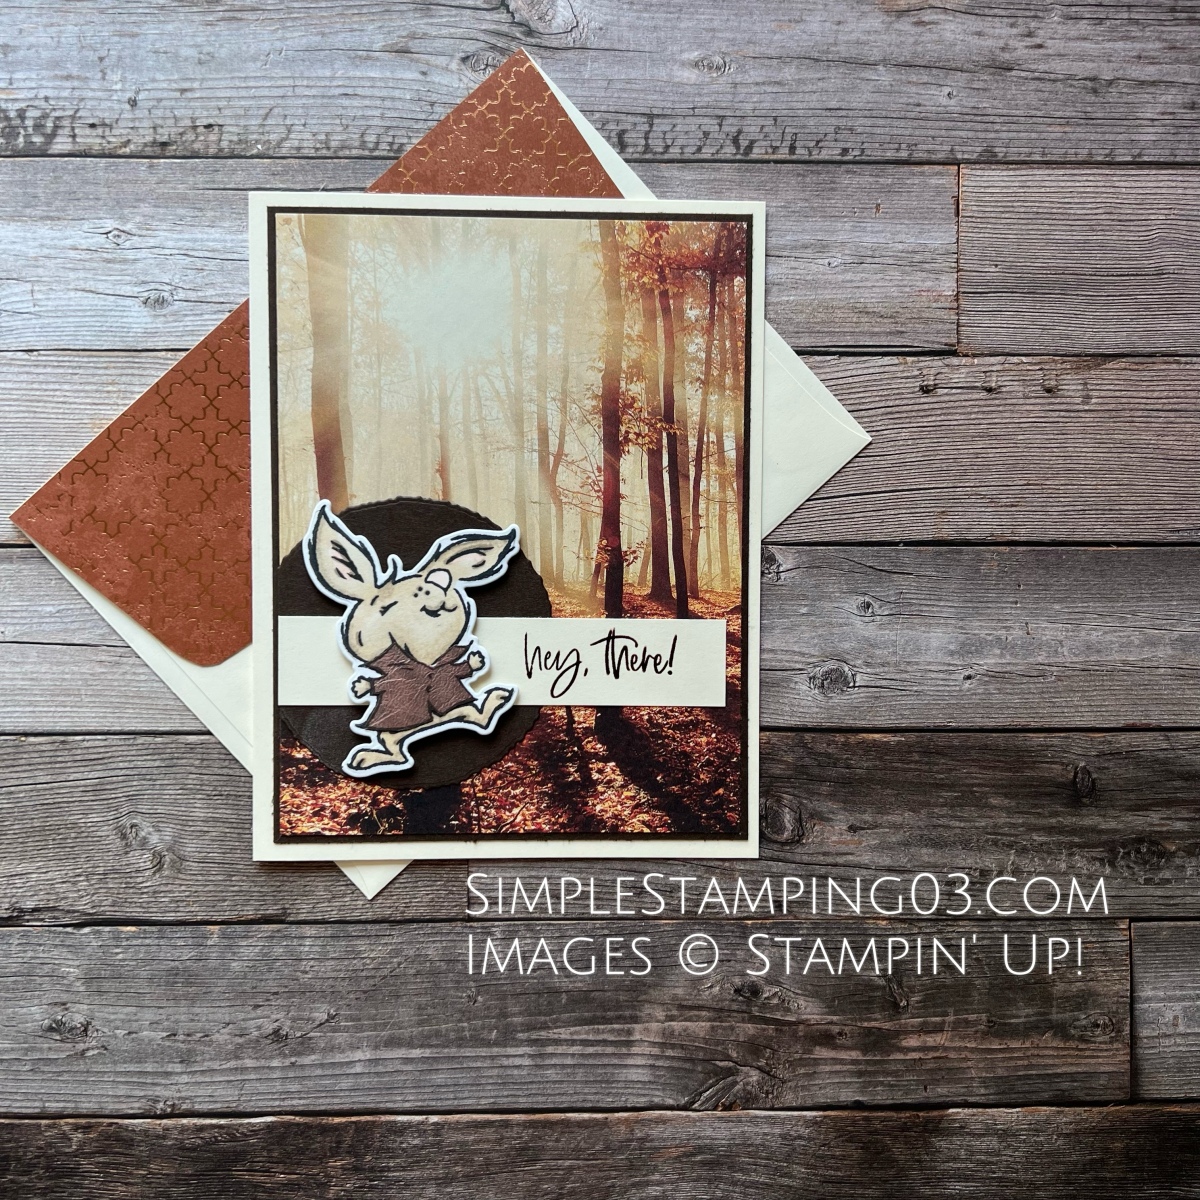
I don’t know about you but I fell in love with the critters from the Playing in the Rain stamp set. I was so excited when I saw it carried over into the 2023-2024 annual catalogue! The bunny has put away the umbrella & is now ready to walk on some crunchy leaves.
Step by Step Tutorial
– Begin with a 5 ½ x 8 ½ card base of Very Vanilla cardstock; scored at the 4 ¼ using a Paper Trimmer
– Use the Paper Trimmer to cut
Early Espresso cardstock 4 x 5 ¼
All About Autumn 6×6 DSP 3 ⅞ x 5 ⅛
– On a scrap piece of Basic White cardstock, stamp the bunny image from the Playing in the Rain stamp set using black Memento ink. Colour the bunny using light & dark Crumb Cake and light & dark Petal Pink Stampin’ Blends
– Stamp the bunny again on a scrap piece of the All About Autumn DSP (the one with brown leather). Then fussy cut the “leather” jacket & adhere to the coloured bunny. Run the stamped & coloured bunny through a Stampin’ Cut & Emboss Machine using the Playing in the Rain dies.
– Run a scrap piece of Early Espresso cardstock through a Stampin’ Cut & Emboss Machine using the Deckled Circles dies (about 2 ½ inch).
– On a 3 ¾ x ¾ strip of Very Vanilla cardstock, stamp the sentiment from the Charming Sentiments stamp set using Early Espresso ink. (Pro tip- I then stamped the sentiment in Versamark & heat embossed it using clear embossing powder)

– Now, it’s time to put all the pieces together. Start by adhering the Deckled Circle to the All About Autumn DSP; have it go off the paper a little bit. Flip it over & trim off the overhanging part. Next, adhere the sentiment strip. Pop-up the bunny using dimensionals. Then adhere the scene to the Early Espresso cardstock. And finally, adhere the card front scene to the Very Vanilla card base.
– To dress up the envelope, glue All About Autumn DSP to the flap of the envelope then fussy cut it.
Scroll to the very bottom to see some alternatives following the same instructions. For the main card, I did not add any bling as it felt “blingy” enough with the DSP. But I did add bling on the alternative samples.
More inspiration awaits, so use the lineup below to visit the rest of the Design Team. Then, please mark your calendars for our next blog hop next month (second Wednesday), when our theme will be The Color Purple.
Until then, have fun in your craft space.
Stampin’ Pretty Pals Blog Hop
- Mary Fish at Stampin’ Pretty
- Jill Loveland at Simple Stamping ←You are here
- Peggy Noe at Pretty Paper Cards
- Tricia Chuba at ButterDish Designs
- Beth McCullough at Stamping Mom
- Rae Harper Burnet at Wild West Paper Arts
- Karen Hallam at Karen’s Stamping Habit
- Debbie Mageed at Secrets to Stamping
- Lori Webb at Clever Copies
- Windy Ellard at Windy’s Wonderful Creations
- Stesha Bloodhart at Stampin’ Hoot!
- Mary Hanson at Up North Stampin’
- Su Mohr at Aromas And Art
- Sue Jackson at Just Peachy Stamping
- Deb Walker at Deb Stamps Life
- Lisa Ann Bernard at Queen B Creations